
If you’ve ever wanted to learn Java programming, the very first thing you need is the Java Development Kit (JDK). Without the JDK, writing and running Java programs simply isn’t possible. But don’t worry—I’ll walk you through how to install Java JDK on Windows, Mac, and Linux systems step by step.
Whether you’re an absolute beginner or just reinstalling Java for a fresh start, this guide is designed to make your installation process hassle-free. By the end of this guide, you’ll have Java installed on your machine and ready to start coding!
Let’s dive in!
What is Java JDK?
Before we jump into how to install Java JDK, let’s quickly understand what exactly the JDK is.
JDK (Java Development Kit) is a software development kit provided by Oracle (and other vendors) for developing Java applications. It includes:
- JRE (Java Runtime Environment): To run Java applications.
- Compiler (javac): To convert Java code into machine-readable code.
- Development Tools: Debuggers, documentation generator, and more.
If you want to write Java code and run it, the JDK is your starting point.
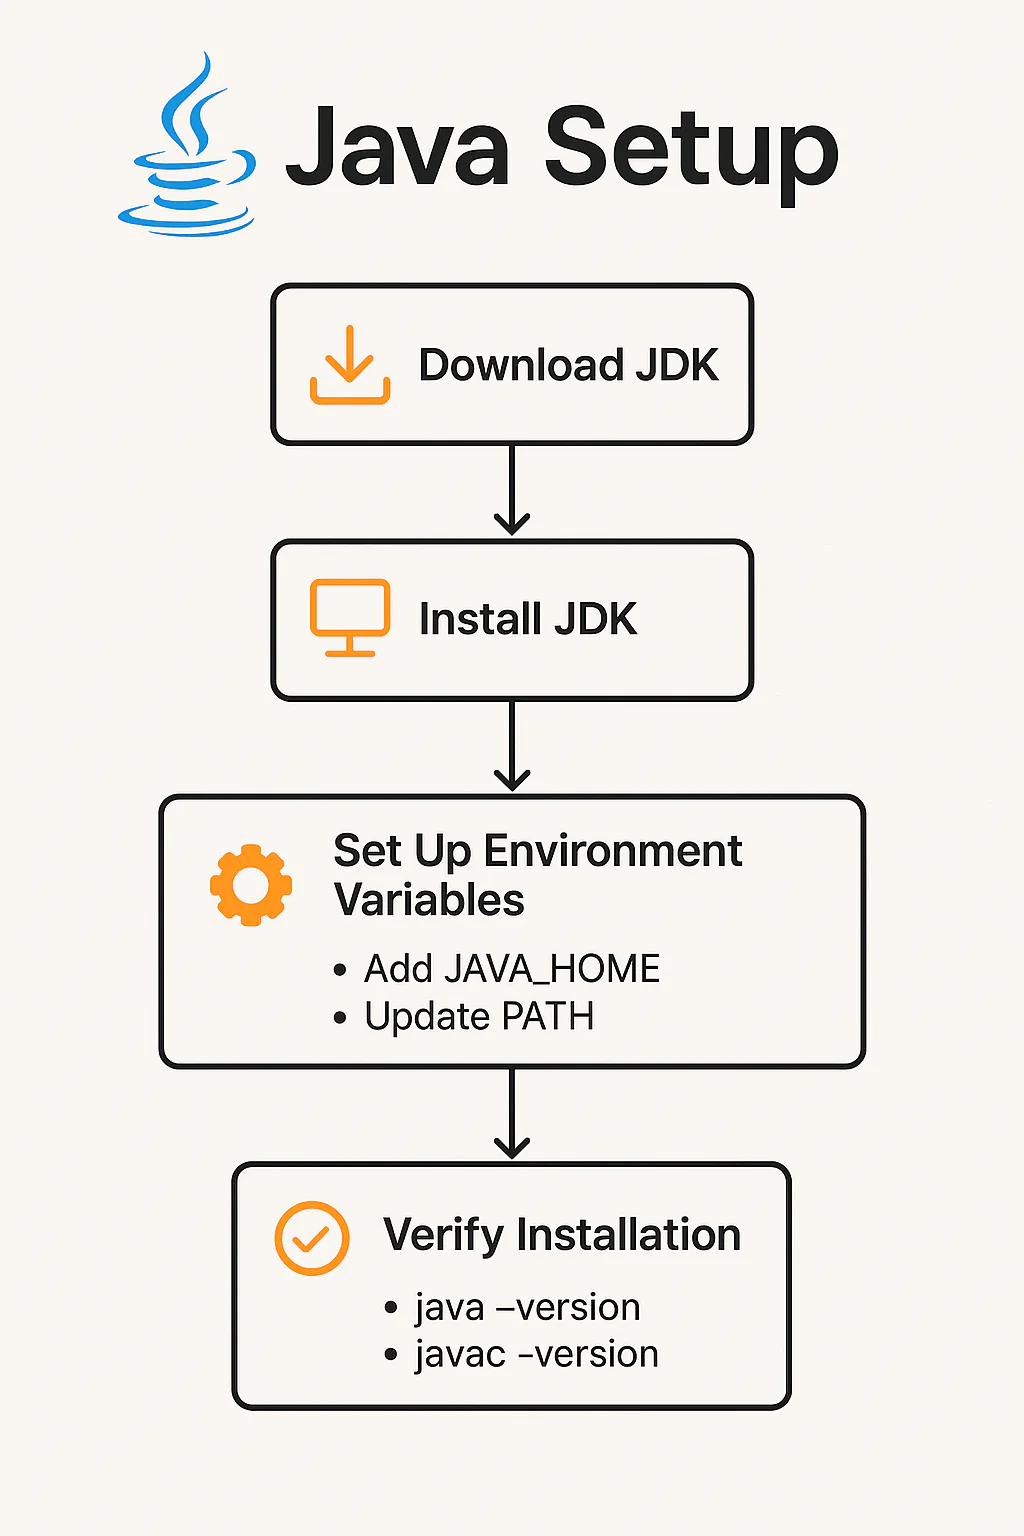
How to Install Java JDK on Windows (Step by Step)
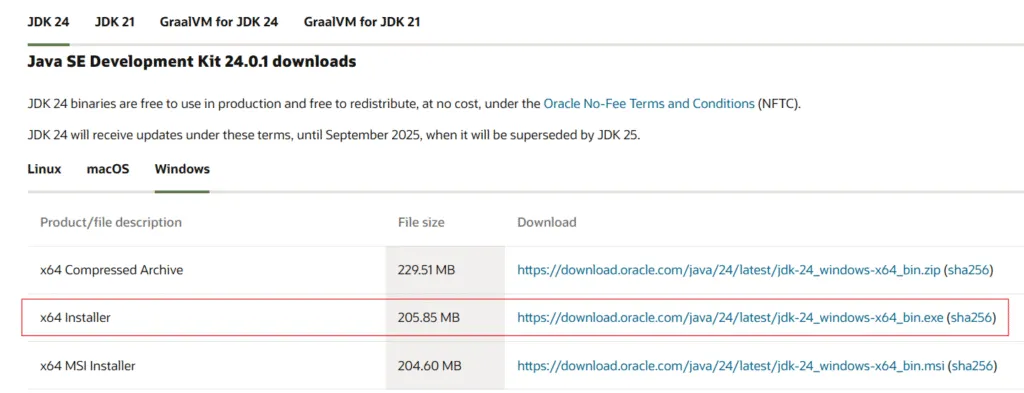
1. Download the JDK
- Go to the official Oracle website: https://www.oracle.com/java/technologies/downloads/
- Scroll to JDK Downloads and choose the latest version.
- Select the Windows Installer (x64).
- Click Download and accept the license agreement if prompted.
2. Install the JDK
- Locate the downloaded
.exefile (usually in your Downloads folder). - Double-click to run the installer.
- Follow the installation wizard:
- Next → choose destination folder → Next → Install → Finish
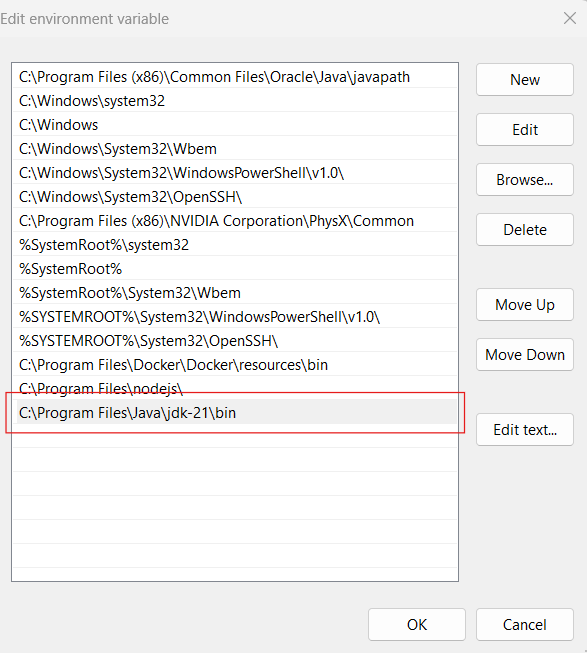
3. Set Environment Variables
- Right-click This PC → Properties → Advanced system settings
- Click on Environment Variables
- Under System Variables, find Path, select it, and click Edit.
- Add a new entry:
Example (may vary):C:\Program Files\Java\jdk-21\bin - Click OK on all windows to save.
4. Verify Installation
- Open Command Prompt and type:
java -version - You should see the installed version displayed.
Congratulations! You’ve successfully installed Java JDK on Windows.
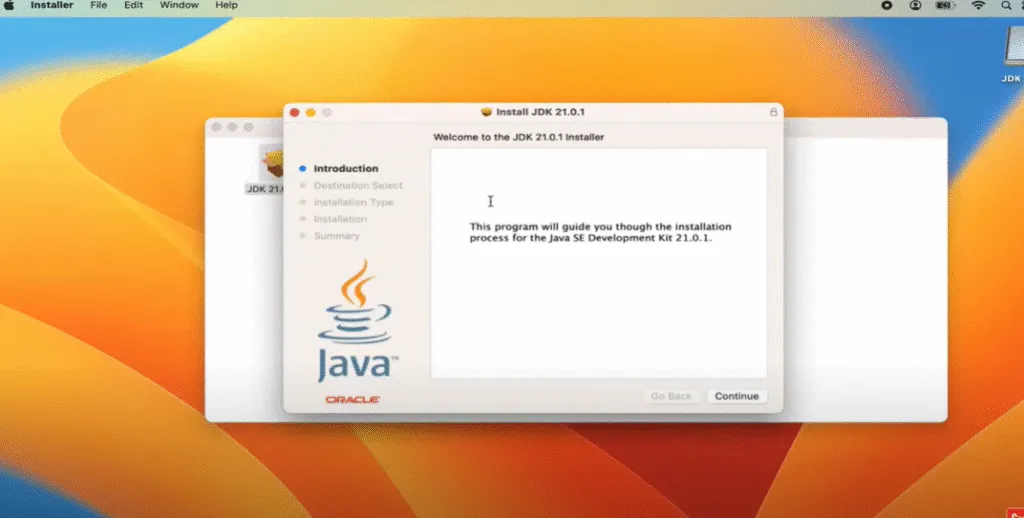
How to Install Java JDK on Mac (Step by Step)
Step 1: Download the JDK
- Download the .DMG file from the Oracle official website
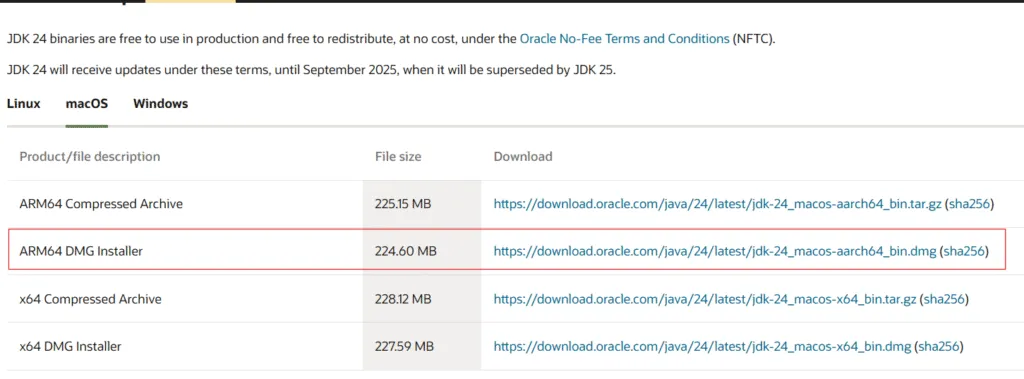
2. Open the .DMG file install the JDK by following on screen instructions
Step 2: Configure Java Path (Optional but recommended)
📌 Step 1: Find the Installed Java Version
First, check where Java is installed:
bash/usr/libexec/java_home -V
Example output:
swiftMatching Java Virtual Machines (1):
21 (x86_64) "Oracle JDK 21" /Library/Java/JavaVirtualMachines/jdk-21.jdk/Contents/Home
📌 Step 2: Set JAVA_HOME Environment Variable
Now, you’ll set the JAVA_HOME path based on the installation location.
Add this line to your shell configuration file:
- For zsh (default in modern macOS):
bashnano ~/.zshrc
- For bash:
bashnano ~/.bash_profile
Add the following line to the file:
bashexport JAVA_HOME=$(/usr/libexec/java_home)
export PATH=$JAVA_HOME/bin:$PATH
📌 Step 3: Apply the Changes
After adding it, apply the changes by running:
bashsource ~/.zshrc
or
bashsource ~/.bash_profile
📌 Step 4: Verify the JAVA_HOME
Check that it’s set correctly:
bashecho $JAVA_HOME
And confirm the version:
bashjava -version
✅ Example Output
/Library/Java/JavaVirtualMachines/jdk-21.jdk/Contents/Home
java version "21" 2024-03-19
Now you’ve successfully set the Java Path in Mac OS!
How to Install Java JDK on Linux (Step by Step)
Depending on your Linux distribution, the process may vary slightly.
Step 1: Update System Packages
bashsudo apt-get update
Step 2: Install OpenJDK
For Ubuntu/Debian systems:
bashsudo apt-get install openjdk-21-jdk
Step 3: Verify Installation
bashjava -version
Step 4: Setting Default Java (Optional)
bashsudo update-alternatives --config java
Follow the on-screen instructions to set the default version.
Now you’ve successfully completed how to install Java JDK on Linux!
Which Version of Java JDK Should You Install?
- For beginners: Start with the latest stable release (e.g., Java 21 or Java 17 LTS).
- For compatibility: If you’re working on legacy projects, you may need older versions like Java 8.
Common Issues During Installation (And How to Fix Them)
| Issue | Solution |
|---|---|
java not recognized as command | Check your environment variable setup. |
| Installer won’t run | Try running as Administrator. |
| Version mismatch | Ensure the correct Path is used. |
Why Do You Need Java JDK?
- To write Java programs.
- To compile your source code into executable code.
- To run applications that require specific Java libraries.
Without the JDK, learning Java is like trying to build a house without any tools.
Helpful Tips for Beginners Learning Java
Now that you’ve installed the JDK, what next? Here are some practical tips:
- Start with Basics: Learn data types, loops, and methods.
- Use IDEs: Start with IntelliJ IDEA or Eclipse.
- Practice: Websites like LeetCode, HackerRank, and CodeChef are excellent for practice.
- Learn Object-Oriented Concepts: Java is fundamentally OOP-based.
- Write Small Programs: Build confidence with mini-projects like calculators or to-do lists.
Conclusion
Learning how to install Java JDK is your first step toward becoming a Java programmer. Whether you’re using Windows, Mac, or Linux, the installation process is straightforward when you follow the steps provided here.
Once installed, you’re all set to begin your journey into Java programming!
If you found this guide helpful, don’t forget to bookmark this page or share it with your fellow programmers. And if you have any questions, drop them in the comments below—I’m here to help!


